
How to setup multi-language content on any Squarespace Template
Update: This script has been updated on November 21st, 2025 to support a recent change in the Navigation structure.
In this example, I am going to setup English and Spanish pages on the same site, by using simple techniques that are available in any Squarespace site. Here is a real example of this process put to use. https://helenasholisticdetox.com/
Easy To Follow Code
If you haven’t added any code to your website before, don’t be alarmed. Below are easy to follow steps on how to implement this code on your website.
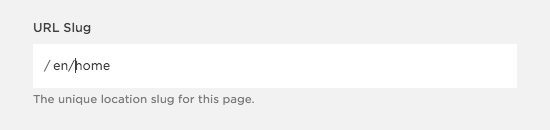
Step 1.
Create a new page, and name it "Home". In the page properties, edit the URL from "/home" to "/en/home". Continue to follow this pattern for all English pages, adding an "en/" to the beginning of each page URL.
Step 2.
Create a new page, and name it "Inicio". In the page properties, edit the URL from "/inicio" to "/es/inicio". Continue to follow this pattern for all Spanish pages, adding an "es/" to the beginning of each page URL.

Step 3.
By this time you should have a series of English and Spanish navigation links. Next we are going to add a little CSS and jQuery.

Step 4.
Open the Advanced Code Injection window (Settings/Advanced/Code Injection/Footer) and we will start with a recent version of jQuery in the "Footer" injection section.
<script src="https://ajax.googleapis.com/ajax/libs/jquery/3.4.1/jquery.min.js"></script>
Next we are going to add a few scripts. Basically, this is setting up a variable based on the URL we setup for each page, and automatically removing the links that do not contain that language variable.
Exclude Items: I have added an exclusion option for items you always want visible. This is a little more advanced option. I have a generic statement, then another specific to the social icons.
New Feature: The script will now automatically exclude pages that do not have a language prefix in the URL slug. This will allow a "Blog" to be visible in both languages.
Note: The default language will be visible for pages that are shared across languages.
New Feature: There is now a section to update "Homepage/Logo" links to the respective language homepage. Simply add the language prefix to the "if statement" and update the URL.
<script src="https://ajax.googleapis.com/ajax/libs/jquery/3.4.1/jquery.min.js"></script>
<script>
  $(function() {
  /* SETUP MULTI-LANGUAGE */
  var defaultLanguage = 'en';
  var lang = location.pathname.split("/")[1];
  var defaultClass = 'lang-'+defaultLanguage+'';
  var itemParent = "nav [class*='collection'],nav [class*='folder'],nav [class*='index'],nav [class*='group']";
  if (lang == "" || lang.length > 2 ){
    var lang = defaultLanguage;
  }

  /* ADD LANGUAGE CLASSES */
  $('a[href="/"]').addClass('lang-'+defaultLanguage+'').parents(itemParent).addClass('lang-'+defaultLanguage+'');
  $('nav a:link:not([href^="http://"]):not([href^="https://"])').each(function () {
    var langType = $(this).attr('href').split("/")[1];
    var multiLanguageClass = 'multilanguage lang-' + langType + '';
    if (undefined !== langType && langType.length <= 2)
      $(this).addClass(multiLanguageClass).parents(itemParent).addClass(multiLanguageClass);
  });
  $('nav button').each(function () {
    var langTypeFolder = $(this).attr('data-href').split("/")[1];
    var multiLanguageClass = 'multilanguage lang-' + langTypeFolder + '';
    if (undefined !== langTypeFolder && langTypeFolder.length <= 2)
      $(this).parents(itemParent).addClass(multiLanguageClass);
  });

  /* HOMEPAGE-LOGO LINKS TO PROPER LANGUAGE HOMEPAGE */
  if (lang == "es") {
    $('a[href="/"]').attr("href", "/es/inicio/");
  }

  /* ADD EXCLUSION NAV ITEMS */
  $('.exclude-me,.exclude-me a').addClass('exclude');
  $('.sqs-svg-icon--list a,.SocialLinks-link,.header-menu-controls-control').addClass('exclude');

  /* REMOVE OTHER LANGUAGES AND KEEP EXCLUDED ITEMS */
  $('.multilanguage').not('.lang-' + lang + ', .exclude').remove();
});
</script>
Step 5.
At this point, we should see the English menu items only. So, lets inject a little code to add a English/Spanish switcher links. These can really be added anywhere. With the following code, we are prepending a <div> with two links at the top of the page. Using CSS you can style this in many ways.
Note: A great option for a language switcher is to use a Cover Page, set this page as Home, and a buttons for each languages 'home page'. The remainder of this tutorial is not necessary.
<script>
/*setup language switcher*/
$('body').prepend('<div class="language"><a href="/en/home" class="lang-en">English</a> | <a href="/es/inicio/" class="lang-es">Español</a></div>');
</script>
A little CSS is needed to make this look appropriate, this is very minimal. Place the following in the Custom CSS. (Design/Custom CSS)
/*setup language switcher*/
.language {
  color: #fff;
  position: absolute;
  top: 10px;
  right: 10px;
  z-index: 99999;
  a {
    color: #fff;
    &:hover {
      opacity: 0.8;
    }
  }
}
Step 5a.
Here is another option to render flags and the language switcher. There is a CSS reference to to a great library that makes this super easy... flag-icon-css Please review the site for the proper code to add to the <span> class, it is probably different than the language codes.
<link rel="stylesheet" type="text/css" href="https://cdnjs.cloudflare.com/ajax/libs/flag-icon-css/2.6.0/css/flag-icon.css">
<script>
/*setup language switcher with flags*/
$('body').prepend('<div class="language"><a href="/en/home" class="lang-en"><span class="flag-icon flag-icon-us"></span></a> <a href="/es/inicio/" class="lang-es"><span class="flag-icon flag-icon-mx"></span></a></div>');
</script>
Step 6.
That is about it. You should now have a functioning multi-language site that can be applied to any Squarespace template.
Related Articles.
Some Squarespace template use Ajax Loading, disable this feature in the Style Editor if you are having an issue with the navigation not refreshing.
All the Code put together.
<link rel="stylesheet" type="text/css" href="https://cdnjs.cloudflare.com/ajax/libs/flag-icon-css/2.6.0/css/flag-icon.css">
<script src="https://ajax.googleapis.com/ajax/libs/jquery/3.4.1/jquery.min.js"></script>
<script>
    $(function() {
    /* SETUP MULTI-LANGUAGE */
    var defaultLanguage = 'en';
    var lang = location.pathname.split("/")[1];
    var defaultClass = 'lang-'+defaultLanguage+'';
    var itemParent = "nav [class*='collection'],nav [class*='folder'],nav [class*='index'],nav [class*='group']";
    if (lang == "" || lang.length > 2 ){
      var lang = defaultLanguage;
    }

    /* ADD LANGUAGE CLASSES */
    $('a[href="/"]').addClass('lang-'+defaultLanguage+'').parents(itemParent).addClass('lang-'+defaultLanguage+'');
    $('nav a:link:not([href^="http://"]):not([href^="https://"])').each(function () {
      var langType = $(this).attr('href').split("/")[1];
      var multiLanguageClass = 'multilanguage lang-' + langType + '';
      if (undefined !== langType && langType.length <= 2)
        $(this).addClass(multiLanguageClass).parents(itemParent).addClass(multiLanguageClass);
    });
    $('nav button').each(function () {
      var langTypeFolder = $(this).attr('data-href').split("/")[1];
      var multiLanguageClass = 'multilanguage lang-' + langTypeFolder + '';
      if (undefined !== langTypeFolder && langTypeFolder.length <= 2)
        $(this).parents(itemParent).addClass(multiLanguageClass);
    });

    /* HOMEPAGE-LOGO LINKS TO PROPER LANGUAGE HOMEPAGE */
    if (lang == "es") {
      $('a[href="/"]').attr("href", "/es/inicio/");
    }

    /* ADD EXCLUSION NAV ITEMS */
    $('.exclude-me,.exclude-me a').addClass('exclude');
    $('.sqs-svg-icon--list a,.SocialLinks-link,.header-menu-controls-control').addClass('exclude');

    /* REMOVE OTHER LANGUAGES AND KEEP EXCLUDED ITEMS */
    $('.multilanguage').not('.lang-' + lang + ', .exclude').remove();

    /* SETUP LANGUAGE SWITCHER */
    $('body').prepend('<div class="language"><a href="/en/home" class="lang-en"><span class="flag-icon flag-icon-us"></span></a> <a href="/es/inicio/" class="lang-es"><span class="flag-icon flag-icon-mx"></span></a></div>');

  });
</script>