How to add Video Background to Squarespace
Adding a looping, autoplay, muted video to Squarespace can be accomplished in several ways. I have seen other sites offer a paid plugin as well as complicated scripts. I am going to share the simplest option that is responsive and just works.
This technique can be applied to any template. CSS and injection point may differ per template.
Step 1.
You will need a video file. iStock and Pikwizard are great resources for short clips. You will need the file to be in a .mp4 file format. It is also recommended to create a .webm file format too. We will setup the .webm file as priority for supported browsers, then use the .mp4 as a fallback. The reason we do this, is that the .webm files are smaller file sizes with similar quality. Performance is always important. Lastly, you will need a 'poster' image for mobile. This is an image that will be used if the video cannot be played, which is the behavior on mobile.
You will need the following:
.mp4 video file
.jpg poster image
.webm video file (recommended)
Step 2.
Now we need to host the files somewhere. Squarespace allows you to upload a 20MB file to local storage, it is not recommended to have a background video that is larger in file size. If your file is larger, than I recommend Vimeo Pro. Vimeo Pro allows you to get a full URL to the video file; the url must end in .mp4.
Navigate to the Custom CSS page /config/design/custom-css within your Squarespace site.
Then click on "Open in Window", then click on "Manage Custom Files". Click on the "Add images or fonts" in the sidebar and choose your video files.
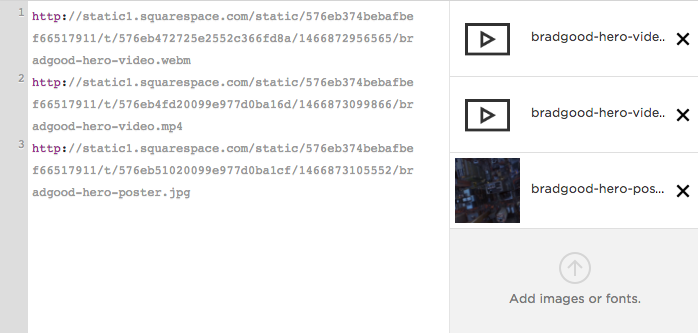
Your Custom CSS/Manage Custom Files sidebar should now look like the following image.

Lastly, click in the CSS area, then click on the sidebar file; this will allow you to get the full URL to the files, which we will need in the next step. Click on the other files, just to get all the URLs for each file. Delete the URLs form the CSS area, as it is invalid CSS and will give you an error. Click Save.
Step 3.
Navigate to the Code Injection page /config/settings/advanced/injection of your Squarespace site. Then paste the following into the Footer code injection area.
<script src="https://ajax.googleapis.com/ajax/libs/jquery/2.2.2/jquery.min.js"></script>
<script>
  $(function () {
    var webm = "http://static1.squarespace.com/static/576eb374bebafbef66517911/t/576eb472725e2552c366fd8a/1466872956565/bradgood-hero-video.webm";
    var mp4 = "http://static1.squarespace.com/static/576eb374bebafbef66517911/t/576eb4fd20099e977d0ba16d/1466873099866/bradgood-hero-video.mp4";
    var poster = "http://static1.squarespace.com/static/576eb374bebafbef66517911/t/576eb51020099e977d0ba1cf/1466873105552/bradgood-hero-poster.jpg"
    $("<div class='video-loop'><video autoplay autobuffer muted playsinline loop poster='" + poster + "'><source type='video/webm' src='" + webm + "'><source type='video/mp4' src='" + mp4 + "'></video></div>").prependTo(".homepage #siteWrapper");
  });
</script>
If you are only using a .mp4 and a poster image then use the following snippet, which does not include the .webm reference.
<script src="https://ajax.googleapis.com/ajax/libs/jquery/2.2.2/jquery.min.js"></script>
<script>
  $(function () {
    var mp4 = "http://static1.squarespace.com/static/576eb374bebafbef66517911/t/576eb4fd20099e977d0ba16d/1466873099866/bradgood-hero-video.mp4";
    var poster = "http://static1.squarespace.com/static/576eb374bebafbef66517911/t/576eb51020099e977d0ba1cf/1466873105552/bradgood-hero-poster.jpg"
    $("<div class='video-loop'><video autoplay autobuffer muted playsinline loop poster='" + poster + "'><source type='video/mp4' src='" + mp4 + "'></video></div>").prependTo(".homepage #siteWrapper");
  });
</script>
Your page should now look similar to the following image.

Step 4.
Update the var URLs for each item webm, mp4 and poster with the URLs from the previous step. Clicking Save and viewing the site, you should see video playing.
Note: I am injecting the video right after the .homepage #siteWrapper. Each Squarespace template has differing id and class structure. You may need to inspect the page with Chrome Developer Tools or Firebug to locate the correct ID to attach the video container. Keep in mind too that the .homepage class is a dynamic class that Squarespace assign to the actual homepage. Each page also contains a unique body ID. We need to prefix with .homepage in this example, otherwise the video would render on every page.
Step 5.
The final step is to add CSS to make this responsive. Navigate to the Custom CSS page /config/design/custom-css within your Squarespace site. The CSS has been setup to keep the video centered on the screen.
In the following CSS I am using a calculated height to make it full screen; the window height minus the header height. height: calc(~"100vh - 86px"); Depending upon the desired result, this value will vary. Keep in mind too that the header height changes when in tablet and mobile views, so it may be necessary to setup a media query to make adjustments.
/* background video */ .video-loop { /* window height minus the header */ height: calc(~"100vh - 86px"); padding-top: 0px; padding-bottom: 0px; position: relative; overflow: hidden; video { position: relative; height: auto; min-width: 100%; min-height: 100%; width: auto; top: 50% !important; left: 50% !important; transform: translate(-50%,-50%) !important; transform: translate(-50%,-50%) !important; transform: translate(-50%,-50%) !important; } }